Introduction
Among the most important concepts that newcomers to AutoCAD need to get to grips with are those of drawing scale and drawing units. You cannot start creating sensible drawings with AutoCAD until you are familiar with scale, units and the commands you use to control them. This tutorial discusses these concepts, starting with the two most commonly asked questions in this subject area.
At what scale should I draw?
As a general rule, everything you draw with AutoCAD will be drawn full size. This often comes as quite a surprise to those who are new to CAD and have spent a number of years working on a drawing board. When you start drawing with AutoCAD you do not have to decide upon a drawing scale as you do when using a drawing board. When drawing on paper you must decide do draw at say, 1:20 or 1:200 depending upon the size of the object that you are drawing so that your scaled drawing will fit on the drawing sheet, be that A3 or A1. In AutoCAD you do not need to decide upon a drawing scale until you come to print the drawing and because the scaling of your drawing takes place at the printing stage, you can create drawings at a scale of 1:1. This has particular advantages because you can, for example, measure lengths, areas and volumes within an AutoCAD drawing and not need to compensate for any scale factor.
Am I drawing in metres or millimetres?
Most people who use AutoCAD, draw using decimal drawing units. What these drawing units represent is entirely up to the individual. However, you must decide what units you will use before you start drawing. One drawing unit could represent one millimetre, one centimetre, one metre, kilometre, mile, furlong or fathom. It is entirely up to you. However, in most parts of the world it is common practice to work in either millimetres or metres. Which of these two units you use will largely depend upon the type of drawing you are creating. For example, if you were creating a detail drawing of a flight of steps, you would most likely use millimetres (Architects will almost always use millimetres). If, on the other hand you are drawing a landscape masterplan, you would probably want to work in metres (Landscape Architects and Civil Engineers usually use metres).
By way of example, consider a drawing where you need to draw a footpath in plan. The footpath is two metres wide. If you are working in millimetres, the footpath would be drawn 2,000 drawing units wide but if you are working in metres, the footpath would be drawn just 2 drawing units wide. To translate this into practical terms, if you had drawn one edge of the path and you intended to draw the other edge using the Offset command, you would enter either "2,000" or "2" for the offset value depending upon whether you were using millimetres or metres respectively.
Although decimal drawing units are the most commonly used, you can configure AutoCAD to work with other types of drawing units. To change the unit type, you must use the Drawing Units dialogue box.
Units Control

| Toolbar | none |
| Pull-down | |
| Keyboard | UNITS |
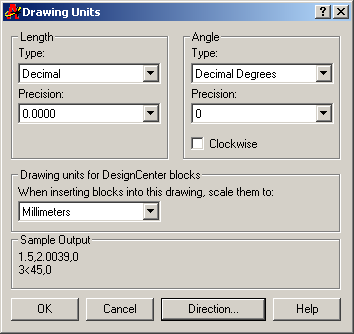
When you start the Units command, the first thing you see is the Drawing Units dialogue box, shown on the right. The dialogue box is divided into four main sections. The upper two are "Length", which refers to linear units and "Angles", referring to angular units. Settings for linear units and angular units can be made independently and in each case, you can control both the type and precision. In addition, the Angles section also allows you to specify the direction in which angles are measured. See below for more details.
A third section, entitled Drawing units for Design Center blocks allows you to assign a specific unit to the drawing so that when blocks are inserted via the AutoCAD Design Centre, they will automatically be scaled. The final section, Sample Output, gives you a preview of the drawing units as they will be displayed using the current settings.
Linear Units
You can see from the dialogue box that there are five different linear unit types for you to choose from, one of which is "Decimal", the default. The table below shows the effect of the different unit settings on two drawing unit values to give you an idea how the various settings might be used along with a brief description.
| Unit Type | 1.5 Drawing Units | 1500 Drawing Units | Description |
|---|---|---|---|
| Decimal | 1.5000 | 1500.0000 | Metric or SI units |
| Scientific | 1.5000E+00 | 1.5000E+03 | Decimal value raised to a power |
| Engineering | 0'-1.5000" | 125'-0.0000" | Feet and decimal inches |
| Architectural | 0'-1 1/2" | 125'-0" | Feet and fractional inches |
| Fractional | 1 1/2 | 1500 | Whole numbers and fractions |
Notice that when you change the unit type, the co-ordinate display on the status bar changes to show co-ordinates using the current unit type. Changing the unit type also affects the way distances, areas and volumes are reported when using the appropriate inquiry command.
For the most part you should not need to change the unit type. Units such as "Architectural" and "Engineering" are there mainly for AutoCAD users in the USA where Feet and Inches are still in common use.
Angular Units
Looking at the Drawing Units dialogue box again, you will notice that there are also five angular unit types. The default is decimal degrees, but there are other options. The table below shows the effect of the different unit types on two angular unit values. As with the linear units, there are not many circumstances under which you would want to use anything other than the default.
| Unit Type | 12.5 Angular Units | 180 Angular Units | Description |
|---|---|---|---|
| Decimal Degrees | 12.500 | 180.000 | Metric units |
| Deg/Min/Sec | 12d30'0" | 180d0'0" | Degrees, Minutes and Seconds |
| Grads | 13.889g | 200.000g | 400 grads = 360 degrees |
| Radians | 0.218r | 3.142r | 2 Pi radians = 360 degrees |
| Surveyor | N 77d30'0" E | W | Compass bearings |
AutoCAD also allows you to control the direction in which angular units are measured and the position of the start angle. By default, AutoCAD starts with the zero angle at the 3 o'clock position (East) with angles increasing in an anti-clockwise direction. For the most part this does not present any problems once you get used to the idea. However, there are specific situations where it may be desirable to have the zero angle at the 12 o'clock position (North) and angles increasing in a clockwise direction. For example, if you are working on a surveyors drawing or a map base, this latter situation enables you to specify angles with respect to North. To change the direction of angular measurement, use the Clockwise check box in the Angle section of the Drawing Units dialogue box. When this box is checked, positive angles are measured in a clockwise direction, when it is not checked (the default), positive angles are measured in an anti-clockwise direction.
 any problems once you get used to the idea. However, there are specific situations where it may be desirable to have the zero angle at the 12 o'clock position (North) and angles increasing in a clockwise direction. For example, if you are working on a surveyors drawing or a map base, this latter situation enables you to specify angles with respect to North. To change the direction of angular measurement, use the Clockwise check box in the Angle section of the Drawing Units dialogue box. When this box is checked, positive angles are measured in a clockwise direction, when it is not checked (the default), positive angles are measured in an anti-clockwise direction.
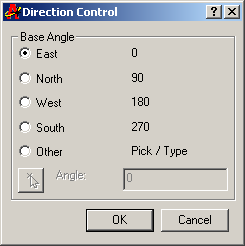
To change the start angle, click on the "Direction…" button in the Drawing Units dialogue box. The Direction Control dialogue box appears. You can set the Base Angle to any of the circle quadrants by clicking on the appropriate radio button or you can set it to a specific angle with the "Other" option. You can enter a specific angle into the edit box or you can pick an angle using the Pick an angle button. The ability to specify an "Other" or user angle can be useful if, for example, your drawing is not oriented to North but where you still want angular measurements to be made with respect to North. To change the direction of angular measurement, simply click on the appropriate radio button.
Unit Precision
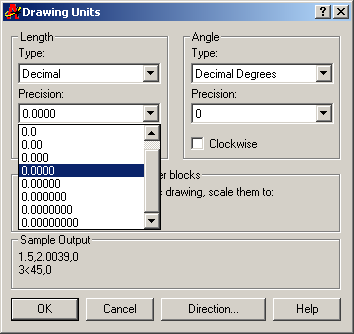
The Drawing Units dialogue box can also be used to set the precision of linear and angular units. By default, AutoCAD sets the linear unit precision to four places of decimal, so distances appear in the form 0.0000. Angular unit precision is set to whole degrees only.

To change the precision with which linear and angular values are displayed, simply click the down arrow against the appropriate drop-down list (see illustration on the left) and select the number of decimal places required. The default setting of four decimal places is usually adequate for linear units. It is, however, often necessary to change the precision for angular units. Working in whole degrees does not usually give an adequate level of detail for many drawing functions. However, you do not need to change the precision of either linear or angular units unless you have a specific reason for doing so.
Changing the unit precision does not make your drawing more accurate, it just means that the co-ordinate display on the status bar and the results from the various inquiry commands will be displayed with a higher degree of precision. The accuracy of your drawing will be determined by the values you enter for the size of objects when you draw and edit them and by the correct use of the various object snaps and drawing aids. See the appropriate tutorials for more details.
No comments:
Post a Comment