The Region Command
| Toolbar | Draw | ||
| Pull-down | Draw | ||
| Keyboard | REGION | short-cut | REG |
A region is a surface created from objects that form a closed shape, known as a loop. The Region command is used to transform objects into regions rather than actually drawing them (i.e. you will need to draw the closed shape or loop first). Once a region is created, there may be little visual difference to the drawing. However, if you set the shade mode to "Flat Shaded", View ShadeFlat Shaded, you will see that the region is, in fact, a surface and not simply an outline. Regions are particularly useful in 3D modeling because they can be extruded.
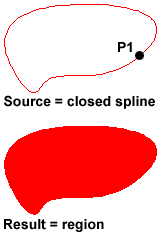
Before starting the Region command, draw a closed shape such as a rectangle, circle or any closed polyline or spline.
Command Sequence
Command: REGION
Select objects: (Pick P1)
Select objects:
1 loop extracted.
1 Region created.
Select objects: (Pick P1)
Select objects:
1 loop extracted.
1 Region created.
You can use the boolean commands, Union, Subtract and Intersect to create complex regions.
The Wipeout Command
| Toolbar | custom | ||
| Pull-down | Draw | ||
| Keyboard | WIPEOUT | ||
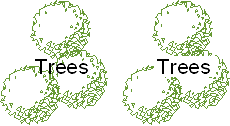
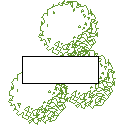
A Wipeout is an image type object. Most commonly it is used to "mask" part of a drawing for clarity. For example, you may want to add text to a complicated part of a drawing. A Wipeout could be used to mask an area behind some text so that the text can easily be read, as in the example shown on the right.
The Wipeout command can be used for 3 different operations. It can be used to draw a wipeout object, as you might expect, but it can also be used to convert an existing closed polyline into a wipeout and it can be used to control the visibility of wipeout frames.
Command Sequence
Command: WIPEOUT
Specify first point or [Frames/Polyline] <Polyline>: (Pick P1)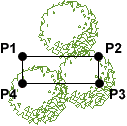 Specify next point: (Pick P2)
Specify next point or [Undo]: (Pick P3)
Specify next point or [Close/Undo]: (Pick P4)
Specify next point or [Close/Undo]:
Specify first point or [Frames/Polyline] <Polyline>: (Pick P1)
Specify next point: (Pick P2)Specify next point or [Undo]: (Pick P3)
Specify next point or [Close/Undo]: (Pick P4)
Specify next point or [Close/Undo]:
You can use as many points as you wish in order to create the shape you need. When you have picked the last point, use right-click and Enter (or hit the Enter key on the keyboard) to complete the command and create the wipeout.
You may find that it is easier to draw a polyline first and then convert that polyline into a wipeout. To do this, start the Wipeout command and then Enter to select the default "Polyline" option. Select the polyline when prompted to do so. Remember, polylines must be closed before they can be converted to wipeouts.
In most cases, you will probably want to turn off the wipeout frame.
Command Sequence
Specify first point or [Frames/Polyline] <Polyline>: F (the Frames option)
Enter mode [ON/OFF] <ON>: OFF Regenerating model.
Enter mode [ON/OFF] <ON>: OFF
Regenerating model.
The Frames option is used to turn frames off (or on) for all wipeouts in the current drawing. You cannot control the visibility of wipeout frames individually. You should also be aware that when frames are turned off, wipeouts cannot be selected. If you need to move or modify a wipeout, you need to have frames turned on.
It is often more convenient to draw the wipeout after the text so that you can see how much space you need. In such a case, you may need to use the DRAWORDER command (ToolsDisplay OrderOption) to force the text to appear above the wipeout.
Tip: If you have the Express Tools loaded, you can use the very useful TEXTMASK command, which automatically creates a wipeout below any selected text. Find it on your pull-down at ExpressTextText Mask
Points and Point Styles
Points are very simple objects and the process of creating them is also very simple. Points are rarely used as drawing components although there is no reason why they could not be. They are normally used just as drawing aids in a similar way that Construction Lines and Rays are used. For example, points are automatically created when you use the Measure and Divide commands to set out distances along a line.
When adding points to a drawing it is usually desirable to set the point style first because the default style can be difficult to see.
The Point Command
| Toolbar | Draw | ||
| Pull-down | Draw | ||
| Keyboard | POINT | short-cut | PO |
The point command will insert a point marker in your drawing at a position which you pick in the drawing window or at any co-ordinate location which you enter at the keyboard. The default point style is a simple dot, which is often difficult to see but you can change the point style to something more easily visible or elaborate using the point style dialogue box. Points can be used for "setting out" a drawing in addition to construction lines. You can Snap to points using the Node object snap. See the Object Snap tutorial for details.
Command Sequence
Command: POINT
Current point modes: PDMODE=0 PDSIZE=0.0000
Specify a point: (pick any point)
Current point modes: PDMODE=0 PDSIZE=0.0000
Specify a point: (pick any point)
Strangely, in Multiple Point mode (the default for the Point button on the Draw toolbar) you will need to use the escape key (Esc) on your keyboard to end the command. The usual right-click or enter doesn't work.
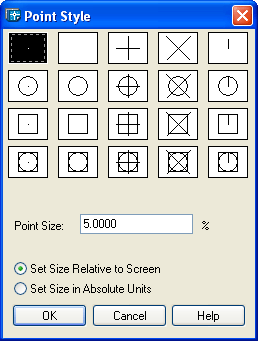
The Point Style Command
| Toolbar | none |
| Pull-down | Format |
| Keyboard | DDPTYPE |
You can start the point style command from the keyboard by typing DDPTYPE or you can start it from the pull-down menu at FormatPoint Style… The command starts by displaying a dialogue box offering a number of options.
To change the point style, just pick the picture of the style you want and then click the "OK" button. You will need to use the Regen command, REGEN at the keyboard or ViewRegen from the pull-down to force any existing points in your drawing to display in the new style. Any new points created after the style has been set will automatically display in the new style.
One interesting aspect of points is that their size can be set to an absolute value or relative to the screen size, expressed as a percentage. The default is for points to display relative to the screen size, which is very useful because it means that points will remain the same size, irrespective of zoom factor. This is particularly convenient when drawings become complex and the drawing process requires a lot of zooming in and out.
No comments:
Post a Comment