Introduction
This tutorial is designed to show you how all of the AutoCAD Draw commands work. If you just need information quickly, use the QuickFind toolbar below to go straight to the command you want or select a topic from the contents list above. Not all of the Draw commands that appear on the Draw toolbar are covered in this tutorial. Blocks, Hatch and Text for example are all tutorial topics in their own right!
The Draw commands can be used to create new objects such as lines and circles. Most AutoCAD drawings are composed purely and simply from these basic components. A good understanding of the Draw commands is fundamental to the efficient use of AutoCAD.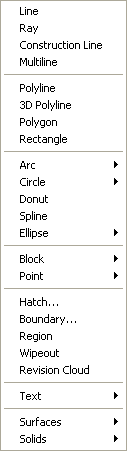
The sections below cover the most frequently used Draw commands such as Line, Polyline and Circle as well as the more advanced commands like Multiline and Multiline Style. As a newcomer to AutoCAD, you may wish to skip the more advanced commands in order to properly master the basics. You can always return to this tutorial in the future when you are more confident.
In common with most AutoCAD commands, the Draw commands can be started in a number of ways. Command names or short-cuts can be entered at the keyboard, commands can be started from the Draw pull-down menu, shown on the right or from the Draw toolbar. The method you use is dependent upon the type of work you are doing and how experienced a user you are. Don't worry too much about this, just use whatever method feels easiest or most convenient at the time. Your drawing technique will improve over time and with experience so don't expect to be working very quickly at first.
If you are working with the pull-down menus, it is worth considering the visual syntax that is common to all pull-downs used in the Windows operating system. For example, a small arrow like so " " next to a menu item means that the item leads to a sub-menu that may contain other commands or command options. An ellipsis, "…" after a menu item means that the item displays a dialogue box. These little visual clues will help you to work more effectively with menus because they tell you what to expect and help to avoid surprises for the newcomer.
Lines
Lines are probably the most simple of AutoCAD objects. Using the Line command, a line can be drawn between any two points picked within the drawing area. Lines are usually the first objects you will want to draw when starting a new drawing because they can be used as "construction lines" upon which the rest of your drawing will be based. Never forget that creating drawings with AutoCAD is not so dissimilar from creating drawings on a drawing board. Many of the basic drawing methods are the same.
Anyone familiar with mathematics will know that lines drawn between points are often called vectors. This terminology is used to describe the type of drawings that AutoCAD creates. AutoCAD drawings are generically referred to as "vector drawings". Vector drawings are extremely useful where precision is the most important criterion because they retain their accuracy irrespective of scale.
| Toolbar | Draw | ||
| Pull-down | Draw | ||
| Keyboard | LINE | short-cut | L |
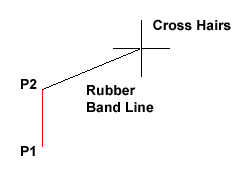 With the Line command you can draw a simple line from one point to another. When you pick the first point and move the cross-hairs to the location of the second point you will see a rubber band line which shows you where the line will be drawn when the second point is picked. Line objects have two ends (the first point and the last point). You can continue picking points and AutoCAD will draw a straight line between each picked point and the previous point. Each line segment drawn is a separate object and can be moved or erased as required. To end this command, just hit the
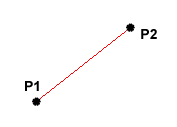
Command Sequence
Command: LINE
Specify first point: (pick P1)
Specify next point or [Undo]: (pick P2)
Specify next point or [Undo]: (to end)
Specify first point: (pick P1)
Specify next point or [Undo]: (pick P2)
Specify next point or [Undo]:
You can also draw lines by entering the co-ordinates of their end points at the command prompt rather than picking their position from the screen. This enables you to draw lines that are off screen, should you want to. (See Using Co-ordinates for more details). You can also draw lines using something called direct distance entry. See the Direct Distance Entry tutorial for details.
| Toolbar | Draw | ||
| Pull-down | Draw | ||
| Keyboard | XLINE | short-cut | XL |
The Construction Line command creates a line of infinite length which passes through two picked points. Construction lines are very useful for creating construction frameworks or grids within which to design.
Construction lines are not normally used as objects in finished drawings, it is usual, therefore, to draw all your construction lines on a separate layer which will be turned off or frozen prior to printing. See the Object Properties tutorial to find out how to create new layers. Because of their nature, the Zoom Extents command option ignores construction lines.
Command Sequence
Command: XLINE
Specify a point or [Hor/Ver/Ang/Bisect/Offset]: (pick a point)
Specify through point: (pick a second point)
Specify through point: (to end or pick another point)
Specify a point or [Hor/Ver/Ang/Bisect/Offset]: (pick a point)
Specify through point: (pick a second point)
Specify through point:
You may notice that there are a number of options with this command. For example, the "Hor" and "Ver" options can be used to draw construction lines that are truly horizontal or vertical. In both these cases, only a single pick point is required because the direction of the line is predetermined. To use a command option, simply enter the capitalised part of the option name at the command prompt. Follow the command sequence below to see how you would draw a construction line using the Horizontal option.
Command Sequence
Command: XLINE
Hor/Ver/Ang/Bisect/Offset/<From point>: H
Through point: (pick a point to position the line)
Through point: (to end or pick a point for another horizontal line)
Hor/Ver/Ang/Bisect/Offset/<From point>: H
Through point: (pick a point to position the line)
Through point:
No comments:
Post a Comment