Introduction
This tutorial describes how to create custom bitmap based materials in AutoCAD and how to create the bitmap tile from scratch in Photoshop. If you would like to follow this tutorial closely, you can download the Garden drawing used in the examples. See Download Sample Data, below.
In many cases, rendering using object colours or the use of materials from the AutoCAD Material Library is all that's required to produce a semi-realistic render of a scene. However, sometimes you might want something specific. This tutorial shows you how to create and use a material that looks just the way you want it.
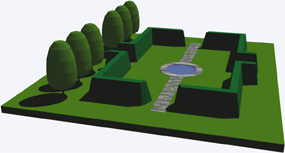 | 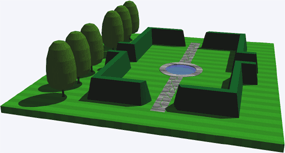 |
Consider the example above. In the image on the left, the ground has been rendered in the object colour and this looks perfectly fine. But say we wanted to give the impression of a close mown lawn as illustrated in the image on the right. Object colour alone can't do this and none of the materials in the Material Library look like this. The only option is to create our own material. This tutorial uses the example of mown grass but the basic principles hold true for any custom bitmap material.
Creating the Bitmap Tile
Before we get to grips with AutoCAD materials, we need to create an image that will be used as the basis of the AutoCAD material. In this tutorial, we will use Photoshop for this part of the process but you can use another bitmap editor if you prefer.
- Start Photoshop and open a new image, from the pull-down menu. You will now see the New image dialogue box. You can use this dialogue box to give your image a Name and to set the Width and Height dimensions. OK, so how big should the bitmap tile be? Well, it depends on how complex your material is. In this case and in most cases where the pattern is relatively simple, a tile of 100 pixels by 100 pixels will work just fine. So, give the image a suitable name, set the measurement units to pixels (if they aren't already) and enter a value of 100 for both the Width and the Height. Click the OK button.
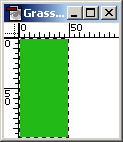
- Next, use the Rectangular Marquee Tool
 to select one half of the image. You can do this with precision by looking at the Info Palette as you drag the marquee.
 - Now use the Color palette to select a green for the grass and then use the Paint Bucket Tool
 to flood fill the half of the bitmap which is selected. Your image should now look something like the illustration on the right.
 - Select the other half of the image by inverting the selection, from the pull-down menu. Select a complimentary green from the Color palette for the other half of the image and use the Paint Bucket Tool to fill the selection.
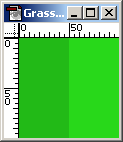 Your image should now look similar to the one on the right. So far, we've just used flat colours to create our bitmap but grass has a texture to it that our image doesn't have. In order to make our grass look a little more realistic, we'll add some texture to the image.
 - The Photoshop Noise filter is probably one of the most useful filters that comes with the application. Most materials look better with a bit of texture, whether you are creating grass, concrete, rock or whatever. In all cases, the Noise filter can be used to add just the right amount of texture.
Start the Noise filter from the pull-down menu, . You will be presented with a small dialogue box that enables you to control the amount and type of noise you want to add to the image.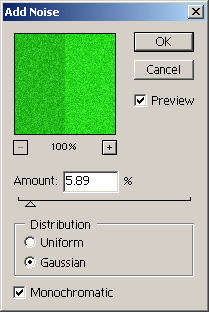 As you can see from the illustration on the right, there are three basic controls. The first, Amount, is fairly obvious, use the slider to set the percentage of noise. The Distribution option changes the pattern of noise; Gaussian looks slightly more random than Uniform. Finally, the Monochromatic option can be used to determine the colour of the noise. Basic noise adds a range of colours to the image, irrespective of the colour of the background. When Monochromatic is selected, the colour of the added noise matches that of the background. The best way to get to grips with these controls is to play about with them. For the grass image, the settings shown in the illustration were used.
 - When you are happy with the image, you will need to save it so that it can be used by AutoCAD. What format should be used and where should it be saved? Well, AutoCAD can use a number of common bitmap file formats and so the sensible option is to keep the file size as small as possible, so JPEG is a good format to use.
If you intend to keep this material for future use, it is a good idea to save the image somewhere sensible (not the Desktop!) like the folder where you keep your textures or to the AutoCAD texture folder, usuallyC:/Program Files/AutoCAD/Textures. This is important because every time you render using the new material, AutoCAD must find the image file in order to render the material correctly. If the image file is moved or deleted, AutoCAD will not find it and your rendered image will not look right.
To save the image, use the Photoshop Save for Web option, from the pull-down menu. This will allow you to choose a suitable compression level.
Creating the Material

Start AutoCAD and open the drawing you want to render. Go to the Materials dialogue box, from the pull-down menu. In the right hand column, you will see a drop-down list with a "New…" button above it. Select "Standard" from the list if it is not already selected and then click the button. You will now see the New Standard Material dialogue box, illustrated below.
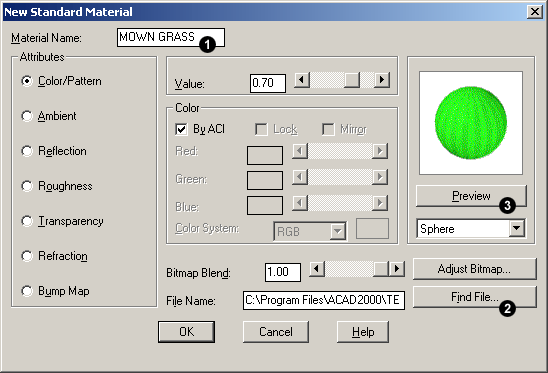
Creating the material is very simple.
- Give the material a suitable name.
- Click the button and select the image you just created in Photoshop. Remember to set the file type in the Bitmap File dialogue.
- Finally, click the Preview button to check that all is well. That's it! Click the OK button to return to the Materials dialogue box.
The next step is to attach the new material to an object and render it to see what it looks like.
Attaching the Material by Layer
Materials can be attached to objects by selecting them or they can be attached by association with the object's colour or layer. In most cases, if your drawing is correctly layered, attaching materials by layer is the most sensible option. In the case of the example used here, the ground plane is on a layer called "GROUND". Since the new material is called MOWN GRASS, all we need to do is attach the MOWN GRASS material to the GROUND layer.
Go to the Materials dialogue box if you don't already have it open and click the By Layer… button at the bottom of the right hand column. The next thing you will see is the Attach by Layer dialogue box, shown below.
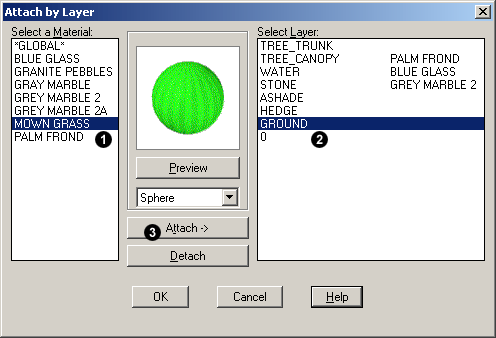
Simply select the material you want to attach from the list on the left, select the layer you want to attach it to from the list on the right and then click the Attach-> button. When you have done this, the material name will appear adjacent to the layer name in the list on the right. Click the OK button to complete the process and return to the Materials dialogue box. Finally, click the OK button in the Materials dialogue box to return to the Command prompt.
Rendering the Model
Now that you have created and attached the new material to part of your model, you will want to render the model to see what the new material looks like. Bear in mind that the material will look different in different lighting conditions, so make sure that you have set up any lights you might need before you render the model. See the Adding Sunlight to your Drawings tutorial for details on how to set up a light that simulates sunlight.
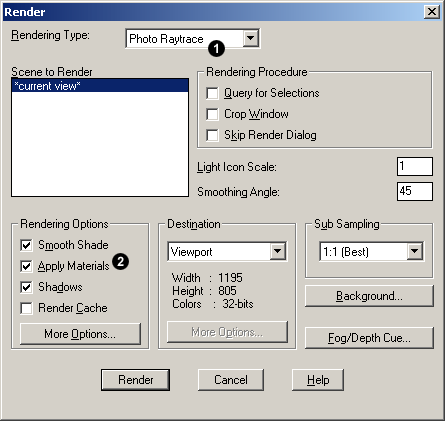
To render the model, select from the pull-down menu. You will now see the Render dialogue box, shown above. Set the Render Type to either "Photo Real" or "Photo Raytrace". Materials will not be displayed if the default "Render" render type is used. Also, make sure that the Apply Materials option is checked in the Rendering Options section of the dialogue box. Click the Render button to begin the render.
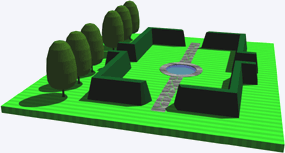 The first render with the new material is shown in the illustration on the right. As you can see, there are two problems with it. First of all, the stripes are too narrow, they should be about twice the width. Second, the rendered effect in the prevailing lighting conditions is far too bright. In order to get the material to display the way we want, we're going to have to make some modifications.
Modifying the Material
AutoCAD enables you to modify materials in many ways. There are lots of parameters that can be used to change the way a material looks. In this particular case, we'll look only at methods for modifying the scale and the brightness.
Modifying Scale
If we want the grass stripes to appear twice as wide as they are shown, we'll need to scale up the bitmap by a factor of two. We could go back to Photoshop and double the size of the image but that wouldn't be particularly efficient. Instead, we'll work with AutoCAD. Go to the Materials dialogue box, from the pull-down menu. Select the material from the list on the left and click the Modify… button at the top of the right hand column. Then, click on the button that says "Adjust Bitmap…". The next thing you see will be the Adjust Material Bitmap Placement dialogue box, shown below.
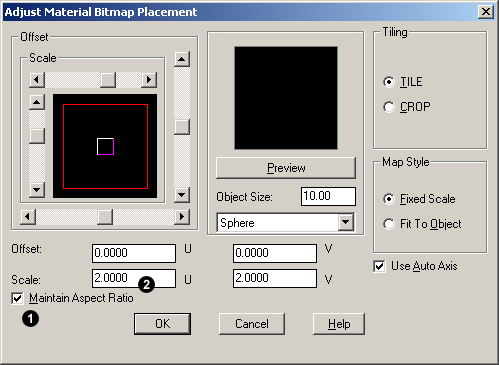
You can use the settings in this dialogue to change many aspect of the bitmap geometry. However, all we want to do is double the scale at which the bitmap is displayed. First, check the Maintain Aspect Ratio option at the bottom left of the dialogue box. Then, enter the value 2 in either the U or V scale edit boxes. Since the default scale is 1, setting the value to 2 will double it. Click the OK button to return to the Modify Standard Material dialogue box, OK again to return to the Materials dialogue and OK a third time to return to the AutoCAD Command prompt. Now render the model again to see the result of your modification. You can see from the illustration on the right that the scale is now correct but the material is still too bright.
 Click the OK button to return to the Modify Standard Material dialogue box, OK again to return to the Materials dialogue and OK a third time to return to the AutoCAD Command prompt. Now render the model again to see the result of your modification. You can see from the illustration on the right that the scale is now correct but the material is still too bright.
Modifying the Brightness
Go once again to the Materials dialogue box, from the pull-down menu. Select the material from the list on the left and click the button at the top of the right hand column. You now see the Modify Standard Material dialogue box, shown below.
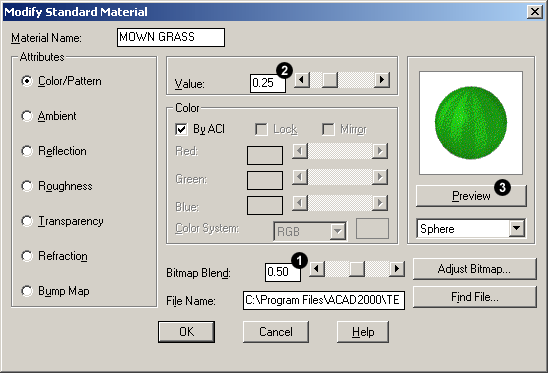
The brightness and the strength or contrast of the material can be adjusted using a combination of two parameters, "Bitmap Blend" and "Value". The way a bitmap material looks is a combination of two components, the bitmap itself and the colour of the object to which it is attached. The Bitmap Blend parameter determines how much of the bitmap or object colour are seen. By default, when you create a new material, AutoCAD sets the Bitmap Blend value to 1.00. This means that only the bitmap is seen and none of the object colour. Setting this value to 0.00 means that only the object colour is seen and none of the bitmap. Between these two values, varying proportions of both bitmap and object colour are seen. The Value parameter controls the brightness of the object colour. The default value of 0.70 gives the true object colour. A lower value causes the colour to darken and a higher value causes the colour to brighten. The Value parameter has absolutely no effect on the material when Bitmap Blend is set to 1.00 because none of the object colour can be seen. However, by adjusting the two values together, it is possible to get just the effect you want.

The settings shown in the illustration above result in the rendered image on the right. Again, this is another of those situations where you really need to play about with the parameters to get a feeling for them and to finish up with just the result you are looking for.
You can use the Preview to get a crude idea of how the changing values affect the material but you will need to render the model to see the results properly. So, when the preview looks about right, click the OK button to return to the Materials dialogue box, OK again to return to the command prompt and then do a final render.
 |
| Bitmap Blend = 0.0 |
 |
| Bitmap Blend = 0.5 |
 |
| Bitmap Blend = 1.0 |
More on Bitmap Blend
Bitmap Blend and the object colour can be used in combination to vary the way the rendered material appears. For example, the 3 cubes on the left have object colours of magenta, red and blue. Each cube also has the Grass material attached. The cubes on the top row have Bitmap Blend set to 0.0, so none of the bitmap is seen. The cubes in the middle row have a Bitmap Blend value of 0.5, so we see 50% of the object colour and 50% of the bitmap. The cubes on the bottom row have a Bitmap Blend value of 1.0, in this case, we see none of the object colour.
The four cubes below all have an object colour of blue. Each cube has the Grass material attached and the Bitmap Blend variable has been set (from left to right) to 0.2, 0.4, 0.6 and 0.8 respectively. You can clearly see the change from object colour to bitmap.
Bear in mind that once Bitmap Blend has been set to a value of less than 1.0, you can also use the Value variable to change the brightness of the object colour. Used in combination, these parameters give amazing control over the way a material looks when it is rendered. As usual, in order to achieve a good understanding of how these parameters affect the final result, you need to experiment.

Download Sample Data
You can use any 3D drawing to follow this tutorial providing that you have drawn a 3D object onto which a material can be attached. Alternatively, you can download the file shown in the images above. Click on the icon below to download the AutoCAD drawing file Garden.dwg. There are two download options, you can either download the drawing file or you can download the smaller compressed file. The compressed Zip file can be uncompressed with a utility such as WinZip.
Save the file to the folder where you keep your AutoCAD drawing files. If you downloaded the zipped version, you will need to unzip it before continuing.
No comments:
Post a Comment