Circles, Arcs etc.
Along with Line and Polyline, the Circle command is probably one of the most frequently used. Fortunately it is also one of the simplest. However, in common with the other commands in this section there are a number of options that can help you construct just the circle you need. Most of these options are self explanatory but in some cases it can be quite confusing. The Circle command, for example, offers 6 ways to create a circle, while the Arc command offers 10 different methods for drawing an arc. The sections below concentrate mainly on the default options but feel free to experiment.
 The Circle Command
| Toolbar | Draw | ||
| Pull-down | Draw | ||
| Keyboard | CIRCLE | short-cut | C |
The Circle command is used to draw circles. There are a number of ways you can define the circle. The default method is to pick the centre point and then to either pick a second point on the circumference of the circle or enter the circle radius at the keyboard.
Command Sequence
Command: CIRCLE
Specify center point for circle or [3P/2P/Ttr (tan tan radius)]: (pick P1)
Specify radius of circle or [Diameter] <50.0195>: (pick P2 or enter the exact radius)
Specify center point for circle or [3P/2P/Ttr (tan tan radius)]: (pick P1)
Specify radius of circle or [Diameter] <50.0195>: (pick P2 or enter the exact radius)
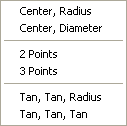 As you can see from the command prompt above the default options are always indicated in triangular brackets like so <Default>and command options appear within square brackets like so [Option]. Each option is separated by a forward slash like this /. You can choose to use the alternative options by typing them at the prompt. For example, the circle command gives you three extra options to define a circle. 3P which uses any three points on the circumference, 2P which uses two points on the circumference to form a diameter and Ttr which stands for Tangent Tangent Radius. Obviously to use this last option you need to have drawn two lines which you can use as tangents to the circle. Try these options out to see how they work. Note that to invoke a command option, you need only type the upper-case part of the option name. For example, if you want to use the Ttr option, you need only enter "T". There are two more circle options on the pull-down menu that enable you to draw a circle by defining the center and diameter or by using 3 tangents.
| Toolbar | Draw | ||
| Pull-down | Draw | ||
| Keyboard | ARC | short-cut | A |
The Arc Command
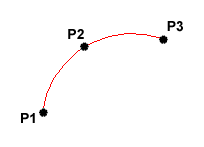 The Arc command allows you to draw an arc of a circle. There are numerous ways to define an arc, the default method uses three pick points, a start point, a second point and an end point. Using this method, the drawn arc will start at the first pick point, pass through the second point and end at the third point. Once you have mastered the default method try some of the others. You may, for example need to draw an arc with a specific radius. All of the Arc command options are available from the pull-down menu.
Command Sequence
Command: ARC
Specify start point of arc or [Center]: (pick P1)
Specify second point of arc or [Center/End]: (pick P2)
Specify end point of arc: (pick P3)
Specify start point of arc or [Center]: (pick P1)
Specify second point of arc or [Center/End]: (pick P2)
Specify end point of arc: (pick P3)
It is also possible to create an arc by trimming a circle object. In practice, many arcs are actually created this way. See the Trim command on the Modifying Objects tutorial for details.
The Spline Command
| Toolbar | Draw | ||
| Pull-down | Draw | ||
| Keyboard | SPLINE | short-cut | SPL |
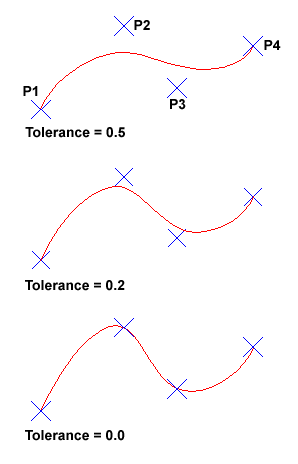 The Spline command creates a type of spline known as a nonuniform rational B-spline, NURBS for short. A spline is a smooth curve that is fitted along a number of control points. The Fit Tolerance option can be used to control how closely the spline conforms to the control points. A low tolerance value causes the spline to form close to the control points. A tolerance of 0 (zero) forces the spline to pass through the control points. The illustration on the right shows the effect of different tolerance values on a spline that is defined using the same four control points, P1, P2, P3 and P4.
Splines can be edited after they have been created using the SPLINEDIT command, Modify ObjectSpline from the pull-down menu. Using this command, you can change the tolerance, add more control points move control points and close splines, amongst other things. However, if you just want to move spline control points, it is best to use grips. See the Stretching with Grips section of theModifying Objects tutorial for details.
Command Sequence
Command: SPLINE
Specify first point or [Object]: (Pick P1)
Specify next point: (Pick P2)
Specify next point or [Close/Fit tolerance] <start tangent>: (Pick P3)
Specify next point or [Close/Fit tolerance] <start tangent>: (Pick P4)
Specify next point or [Close/Fit tolerance] <start tangent>:
Specify start tangent: (pick a point)
Specify end tangent: (pick a point)
You can create linear approximations to splines by smoothing polylines with the PEDIT command,ModifyPolyline from the pull-down menu. However, you can also turn polylines into true splines using the Object option of the Spline command.
| Toolbar | Draw | ||
| Pull-down | Draw | ||
| Keyboard | ELLIPSE | short-cut | EL |
The Ellipse Command
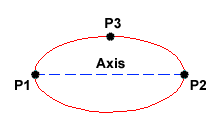 The Ellipse command gives you a number of different creation options. The default option is to pick the two end points of an axis and then a third point to define the eccentricity of the ellipse. After you have mastered the default option, try out the others.
Command Sequence
Command: ELLIPSE
Specify axis endpoint of ellipse or [Arc/Center]: (pick P1)
Specify other endpoint of axis: (pick P2)
Specify distance to other axis or [Rotation]: (pick P3)
Specify axis endpoint of ellipse or [Arc/Center]: (pick P1)
Specify other endpoint of axis: (pick P2)
Specify distance to other axis or [Rotation]: (pick P3)
The ellipse command can also be used to draw isometric circles. See the worked example in the Drawing Aids tutorial to find out how to do this and how to draw in isometric projection with AutoCAD.
The Ellipse Arc Command
| Toolbar | Draw | ||
| Pull-down | Draw | ||
| Keyboard | ELLIPSE | short-cut | EL |
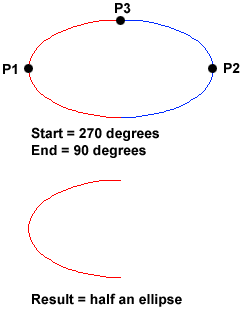 The Ellipse Arc command is very similar to the Ellipse command, described above. The only difference is that, in addition to specifying the two axis end points and the "distance to other axis" point, you are prompted for a start and end angle for the arc. You may specify angles by picking points or by entering values at the command prompt. Remember that angles are measured in an anti-clockwise direction, starting at the 3 o'clock position.
In truth, the Ellipse Arc command is not a new or separate command; it is just an option of the Ellipse command and it therefore has no unique command line name. It is curious why Autodesk considered this option important enough to give it it's own button on the Draw toolbar. Still, there it is.
Command Sequence
Command: ELLIPSE
Specify axis endpoint of ellipse or [Arc/Center]: A
Specify axis endpoint of elliptical arc or [Center]: (pick P1)
Specify other endpoint of axis: (pick P2)
Specify distance to other axis or [Rotation]: (pick P3)
Specify start angle or [Parameter]: 270
Specify end angle or [Parameter/Included angle]: 90
No comments:
Post a Comment